Wednesday, August 23, 2023

WordPress Settings

 In WordPress, the "Settings" section refers to the part of the WordPress Dashboard where you can configure various global settings that affect the overall behavior, appearance, and functionality of your website. These settings control how your site operates, displays content, interacts with users, and more. Here's an overview of the different settings you can adjust in WordPress:

To access the Settings section, log in to your WordPress Dashboard and navigate to "Settings" on the left-hand menu.

  1. General Settings:

    • Site Title: The name of your website.
    • Tagline: A brief description or slogan for your site.
    • WordPress Address (URL): The URL where your WordPress core files are located.
    • Site Address (URL): The URL where your website is accessible to visitors.
    • Timezone: Set the timezone for your site's publishing schedule.
    • Date Format: Choose how dates are displayed on your site.
  2. Writing Settings:

    • Default Post Category: Choose a default category for new posts.
    • Default Post Format: Choose a default format for new posts.
    • Post via email: Allow posts to be created via email.
    • Update Services: Notify update services when you publish new content.
  3. Reading Settings:

    • Front page displays: Choose between displaying your latest posts or a static page on the front page.
    • Blog pages show at most: Set the number of posts displayed per page.
    • Search Engine Visibility: Discourage search engines from indexing your site (useful during development).
  4. Discussion Settings:

    • Default article settings: Set defaults for comments and pingbacks.
    • Other comment settings: Configure settings related to comments and notifications.
    • Avatars: Choose how avatars are displayed in comments.
  5. Media Settings:

    • Image sizes: Configure default sizes for thumbnails, medium, and large images.
    • Uploading files: Choose the folder and structure for organizing uploaded media.
  6. Permalinks Settings:

    • Common settings for URLs: Choose the structure of your website's permalinks (URLs).
  7. Privacy Settings:

    • Privacy Policy Page: Select a page to display your privacy policy.

These settings provide control over essential aspects of your WordPress website. It's important to review and configure these settings according to your website's goals and requirements. However, be cautious when making changes to settings that you're not familiar with, as they can impact how your website operates.

Keep in mind that the exact settings available to you might vary depending on your WordPress version, theme, and any plugins you have installed. Always remember to save your changes after making adjustments to settings.

Friday, August 11, 2023

What is Plugins In WordPress?

 In WordPress, "plugins" are pieces of software that can be added to your website to extend its functionality and add new features without altering the core code of WordPress itself. Plugins are like add-ons or modules that allow you to customize your website according to your specific needs, without requiring advanced coding knowledge.

Here's how plugins work in WordPress:

  1. Installing Plugins: To add a new plugin to your WordPress website, log in to your WordPress Dashboard, navigate to "Plugins," and click on "Add New." You can then search for plugins by name or by the functionality you're looking to add.

  2. Activating Plugins: After finding a plugin that suits your needs, you can install and activate it. Once activated, the plugin becomes part of your website's functionality.

  3. Extending Functionality: Plugins can add various functionalities to your website. For example, you can use plugins to add contact forms, social media sharing buttons, e-commerce features, SEO optimization, caching, security enhancements, and much more.

  4. Managing Plugins: From the "Plugins" section of your WordPress Dashboard, you can see a list of all installed plugins. You can activate, deactivate, or delete plugins from this area. It's important to note that having too many plugins, especially those with overlapping functions, can affect your website's performance and security.

  5. Updating Plugins: Like WordPress itself, plugins also receive updates to improve performance, fix bugs, and enhance features. It's crucial to keep your plugins up to date to ensure compatibility and security.

  6. Customization: Some plugins offer customization options that allow you to configure their settings according to your preferences. These settings can usually be accessed from a dedicated area within the Dashboard.

  7. Premium and Free Plugins: The WordPress plugin repository offers thousands of free plugins. There are also premium plugins available for purchase from third-party developers or marketplaces. Premium plugins often offer more advanced features and dedicated support.

It's important to be cautious when selecting and installing plugins. While plugins can greatly enhance your website's functionality, using too many or poorly coded plugins can slow down your site, cause conflicts, or even compromise security. Always choose reputable plugins from trusted sources, check user reviews, and make sure they are regularly updated and well-maintained.

Plugins are one of the reasons WordPress is so versatile and adaptable to a wide range of website types, from blogs to e-commerce sites and beyond. They empower website owners to build feature-rich websites without the need for extensive custom development.

Wednesday, August 9, 2023

What is Customizer in wordpress?

 The "Customizer" in WordPress refers to the theme customization tool that allows users to make real-time visual changes to the appearance and settings of their website. It provides a user-friendly interface that lets you preview and adjust various design elements without needing to have advanced coding knowledge. The Customizer is a powerful feature that empowers users to personalize their websites and see the changes live as they are being made.

To access the Customizer in WordPress, follow these steps:

  1. Log in to your WordPress Dashboard.
  2. Navigate to "Appearance": In the left-hand menu, hover your cursor over "Appearance" and click on "Customize."

Once you're in the Customizer, you'll typically see a sidebar or panel on the left side of the screen with various options and settings related to your theme's design and layout. The right side of the screen displays a live preview of your website, allowing you to see the effects of your changes in real time.

Here are some common elements you can customize using the Customizer:

  1. Site Identity: Change your site's title, tagline, and logo.
  2. Colors: Adjust the color scheme of your website, including text, background, and links.
  3. Header: Customize the header layout, header image, and navigation menu.
  4. Background Image: Set or change the background image or color of your site.
  5. Menus: Create and manage navigation menus, including their location and content.
  6. Widgets: Add, remove, or rearrange widgets in widget-ready areas.
  7. Homepage Settings: Choose a static page or latest posts for your homepage.
  8. Additional CSS: Add custom CSS code to override theme styles.

As you make changes in the Customizer, you'll see them reflected immediately in the live preview on the right side. This allows you to experiment with different design options and see how they impact the overall look of your website before committing to the changes.

It's important to note that the availability of customization options in the Customizer can vary depending on the theme you're using. Some themes offer more extensive customization options than others. Additionally, any changes you make in the Customizer are not permanent until you click the "Publish" button at the top of the Customizer panel. Once you're satisfied with your changes, clicking "Publish" will make them live on your website for visitors to see.

Overall, the Customizer is a valuable tool for users who want to personalize their WordPress websites' appearance and functionality without delving into code or needing to refresh the page to see changes take effect.

Tuesday, August 1, 2023

What is Themes in WordPress?


In WordPress, "Themes" refer to pre-designed templates that control the overall look and feel of your website. They determine the layout, color scheme, typography, and other design elements, allowing you to change the appearance of your website with just a few clicks. Themes play a crucial role in customizing the visual appearance of your WordPress site without the need for extensive coding.

Here's how themes work in WordPress:

  1. Selecting a Theme: When you install WordPress, it comes with a default theme. However, you can change it to another theme that suits your website's purpose and style better. To do this, log in to your WordPress Dashboard, navigate to "Appearance" and click on "Themes." From there, you can browse a variety of free and premium themes available in the WordPress theme repository or upload a custom theme if you have one.

  2. Installing and Activating Themes: Once you've found a theme you like, you can install it directly from the theme repository by clicking the "Install" button. After installation, click the "Activate" button to make the theme active on your website.

  3. Customizing Themes: Many themes come with customization options that allow you to tailor the appearance to your liking. You can access the "Customize" option by clicking on "Customize" under the "Appearance" section. The customizer provides a live preview of your changes, allowing you to see how they affect your site before saving them.

  4. Custom Page Templates: Some themes offer custom page templates, which are pre-designed layouts for specific types of pages (e.g., landing page, contact page). Using custom page templates, you can easily create pages with different designs and functionalities.

  5. Child Themes: WordPress also supports child themes, which are themes that inherit the styles and functionality of a parent theme. Child themes are useful for making customizations to a theme while preserving the ability to update the parent theme without losing changes.

  6. Responsive Design: Many modern themes are designed to be responsive, meaning they adapt and display well on various devices and screen sizes, such as desktops, tablets, and smartphones.

  7. Theme Updates: Themes are regularly updated to improve performance, fix bugs, and add new features. It's essential to keep your theme up to date to ensure compatibility and security.

Choosing the right theme is crucial as it sets the tone for your website and impacts user experience. Whether you're running a blog, e-commerce site, portfolio, or business website, there are themes available for every type of site. When selecting a theme, consider factors like responsiveness, customizability, support, and compatibility with plugins you plan to use.In WordPress, "Themes" refer to pre-designed templates that control the overall look and feel of your website. They determine the layout, color scheme, typography, and other design elements, allowing you to change the appearance of your website with just a few clicks. Themes play a crucial role in customizing the visual appearance of your WordPress site without the need for extensive coding.

Here's how themes work in WordPress:

  1. Selecting a Theme: When you install WordPress, it comes with a default theme. However, you can change it to another theme that suits your website's purpose and style better. To do this, log in to your WordPress Dashboard, navigate to "Appearance" and click on "Themes." From there, you can browse a variety of free and premium themes available in the WordPress theme repository or upload a custom theme if you have one.

  2. Installing and Activating Themes: Once you've found a theme you like, you can install it directly from the theme repository by clicking the "Install" button. After installation, click the "Activate" button to make the theme active on your website.

  3. Customizing Themes: Many themes come with customization options that allow you to tailor the appearance to your liking. You can access the "Customize" option by clicking on "Customize" under the "Appearance" section. The customizer provides a live preview of your changes, allowing you to see how they affect your site before saving them.

  4. Custom Page Templates: Some themes offer custom page templates, which are pre-designed layouts for specific types of pages (e.g., landing page, contact page). Using custom page templates, you can easily create pages with different designs and functionalities.

  5. Child Themes: WordPress also supports child themes, which are themes that inherit the styles and functionality of a parent theme. Child themes are useful for making customizations to a theme while preserving the ability to update the parent theme without losing changes.

  6. Responsive Design: Many modern themes are designed to be responsive, meaning they adapt and display well on various devices and screen sizes, such as desktops, tablets, and smartphones.

  7. Theme Updates: Themes are regularly updated to improve performance, fix bugs, and add new features. It's essential to keep your theme up to date to ensure compatibility and security.

Choosing the right theme is crucial as it sets the tone for your website and impacts user experience. Whether you're running a blog, e-commerce site, portfolio, or business website, there are themes available for every type of site. When selecting a theme, consider factors like responsiveness, customizability, support, and compatibility with plugins you plan to use.

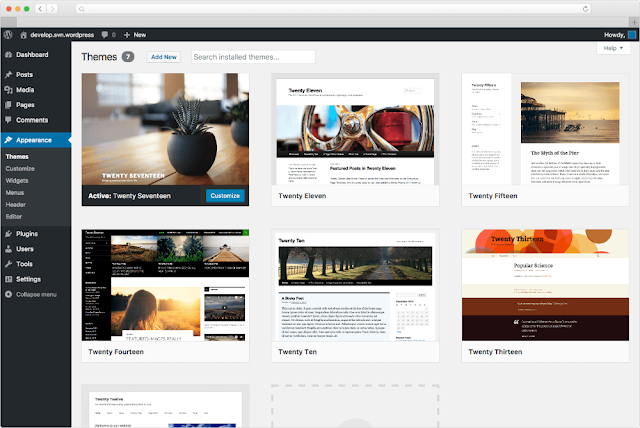
Monday, July 31, 2023

Appearance tab and its functions


In WordPress, "Appearance" refers to the section of the WordPress Dashboard where you can customize the visual elements and design of your website. It allows you to control how your site looks and feels to visitors, giving you the flexibility to create a unique and attractive online presence.

To access the Appearance section, you need to log in to your WordPress Dashboard, and then follow these steps:

  1. Navigate to Appearance: In the left-hand menu, hover your cursor over "Appearance."

  2. Themes: The first option you'll see under Appearance is "Themes." Clicking on "Themes" will take you to the page where you can browse and select different themes for your website. Themes control the overall layout, color scheme, and design of your site. You can choose from free themes available in the WordPress theme repository or upload a premium theme if you have one.

  3. Customize: Many themes come with a "Customize" option, which allows you to make real-time changes to various aspects of your website, such as site identity (logo and site title), header, background, colors, menus, widgets, and more. The Customizer provides a user-friendly interface, enabling you to see the changes you make instantly before saving them.

  4. Widgets: The "Widgets" option allows you to manage the content blocks that appear in widget-ready areas of your website, such as sidebars and footers. You can drag and drop widgets to these areas and configure their settings.

  5. Menus: In the "Menus" section, you can create and manage custom navigation menus for your website. You can add pages, posts, custom links, and categories to your menus and arrange them as desired.

  6. Header: Depending on your theme, you may have a separate "Header" section that allows you to customize the header of your website, including the logo, header image, and header text.

  7. Background: The "Background" option lets you change the background image or color of your website.

  8. Editor: This option provides access to the theme code editor, where advanced users can make direct changes to the theme's code (e.g., CSS, PHP). Caution is advised when using the Editor, as improper changes can break your site.

By using the Appearance section in WordPress, you can easily personalize and customize your website's appearance without any coding knowledge. It empowers you to create a website that aligns with your brand, style, and vision, making it a crucial aspect of WordPress for website owners and administrators.

For Professional website contact WEB CODE ADDICT

View this post on Instagram A post shared by WebCodeAddict (@webcodeaddicted)