Thursday, July 27, 2023
Wednesday, July 26, 2023
How to create posts and page in wordpress?
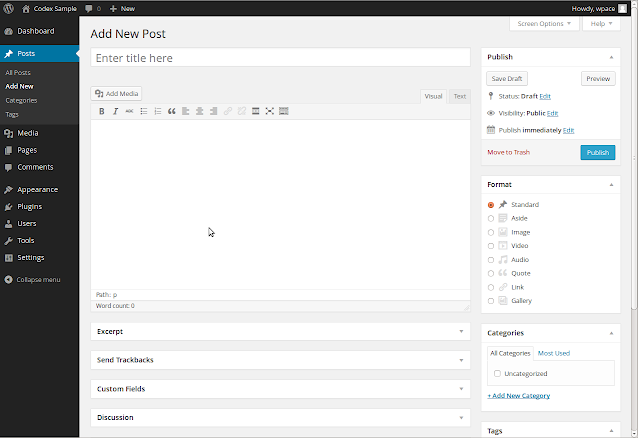
Creating posts and pages in WordPress is a straightforward process. Here's a step-by-step guide on how to do it:
Creating a Post:
- Login to your WordPress Dashboard: Go to your website's admin area by entering your website's URL followed by "/wp-admin" (e.g., www.yourwebsite.com/wp-admin). Enter your username and password to log in.
- Navigate to the Posts Section: Once logged in, on the left-hand side of the Dashboard, you will see a menu. Click on "Posts."
- Add New Post: On the top of the Posts screen, click on "Add New."
- Enter Title and Content: In the Add New Post editor, enter the title of your post in the designated field. Below the title, you can enter the content of your post using the text editor. You can format text, add media, and customize your content.
- Set Categories and Tags (Optional): On the right-hand side, you can assign categories and tags to organize your post better. Categories help group related posts together, while tags allow for more specific identification.
- Preview and Publish: You can click on the "Preview" button to see how your post will look on the live site. If you're satisfied, click the "Publish" button to make the post live on your website.
Creating a Page:
- Login to your WordPress Dashboard: Follow the same steps as above to log in.
- Navigate to the Pages Section: In the left-hand menu, click on "Pages."
- Add New Page: Similar to creating a post, click on "Add New" on top of the Pages screen.
- Enter Title and Content: Provide a title for your page and use the text editor below to add content. You can insert text, images, videos, and other media as needed.
- Page Attributes (Optional): Depending on your theme, you might see "Page Attributes" on the right-hand side. Here, you can set the parent page (if you want to create a hierarchical structure) and the page template (if your theme supports it).
- Publish the Page: Once you're done with the content, click the "Publish" button to make the page live on your website.
Editing Existing Posts and Pages:
To edit existing posts or pages:
- Log in to your WordPress Dashboard.
- Navigate to the Posts or Pages Section from the left-hand menu.
- Locate the Post or Page: You can use the search bar or scroll through the list of posts/pages.
- Click on the Post/Page Title: This will take you to the editing screen, where you can make changes to the content.
- Update the Post/Page: After making your edits, click the "Update" button to save the changes.
That's it! You now know how to create, edit, and publish posts and pages in WordPress. Remember to explore the various formatting and media options available in the text editor to create engaging and visually appealing content.
Wednesday, April 26, 2023
Redirect Non Members to any page in pro Membership
<?php function my_redirect_nonmembers() {
// Make sure PMPro is active.
if ( ! function_exists( 'pmpro_hasMembershipLevel' ) ) {
return;
}
// Ignore members. Change to check for specific levels.
if ( pmpro_hasMembershipLevel() ) {
return;
}
global $post;
if( ! is_admin() && ! empty( $post->ID ) ) {
if( $post->post_type == "page" || $post->post_type == "podcast-video" ) {
//check if the user has access to the parent
if( ! pmpro_has_membership_access( $post->ID ) ) {
wp_redirect( pmpro_url( "levels" ) );
exit;
}
}
}
// Update this array.
$not_allowed = array(
"/members/",
"/groups/",
"/groups/create/",
);
// Get the current URI.
$uri = $_SERVER['REQUEST_URI'];
// If we're on one of those URLs, redirect away.
foreach( $not_allowed as $check ) {
if( strpos( strtolower( $uri ), strtolower( $check ) ) !== false ) {
// Go to levels page. Change if wanted.
wp_redirect( pmpro_url( 'levels' ) );
exit;
}
}
}
add_action( 'template_redirect', 'my_redirect_nonmembers' );
Tuesday, March 28, 2023
Create shortcode use anywhere in WordPress
WordPress short-codes act as shortcuts that allow you to embed elements into a post or page quickly. These usually consist of a single line of code within square brackets, such as [yourshortcode], for example. This code will display a predetermined feature on the front end of your site.
Here is the shortcode.
<?php
// testimonials slider
add_shortcode( 'list-posts-testimonial', 'testimonial_listing_shortcode' );
function testimonial_listing_shortcode( $atts ) {
ob_start();
$query = new WP_Query( array(
'post_type' => 'testimonial',
'posts_per_page' => -1,
'order' => 'ASC',
'orderby' => 'date',
'menu_order'=>'ASC',
) );
if ( $query->have_posts() ) {
?>
<div class="testimonial-slider-sec">
<div class="owl-carousel owl-theme testimonial-slider">
<?php while ( $query->have_posts() ) : $query->the_post(); ?>
<div class="testimonial-items">
<div class="testimonial-box">
<div class="testimonial-img">
<img src="<?php echo get_the_post_thumbnail_url(); ?>" alt="testimonial-image">
</div>
<div class="testimonial-content">
<h4><?php the_title(); ?></h4>
<?php the_field('designation'); ?>
</div>
</div>
</div>
<?php endwhile; ?>
<?php wp_reset_query(); ?>
</div>
</div>
<?php
$myvariable = ob_get_clean();
return $myvariable;
}
}
This shortcode can be used any where in WordPress pages.
[list-posts-testimonial]
It can be modified as per requirement.
For Professional website contact WEB CODE ADDICT
View this post on Instagram A post shared by WebCodeAddict (@webcodeaddicted)
-
CSS tricks to show or hide horizontal and vertical scroll bar Sometimes we need to add scroll bar to a div or span whenever ...
-
Web Design ,Logo Design, graphic design, website design: Web Design : encompasses many different skills and disciplines in the production a...


